Docker - Configure your localhost to use SSL

In a previous article, I've explained how to run a static HTML site in seconds.
The result was a site running on your computer; using http. Let's go one step further and learn how to configure Docker to use https i.e. SSL and encryption.
In this article, you'll learn how to use Apache, nginx and PHP on your machine and be able to start https://localhost.
Our main objective is to use a Docker Apache image to enable access to localhost using either http or https. To do this, I need to create a so-called self-signed certificate and make it work... more or less.
I'm saying more or less because running the website over SSL will work but since it's a self-signed certificate, browsers should be configured so they'll trust our certificate and, too, if we're using curl, we'll need to add the --insecure flag.
Then, in the Bonus section, we'll do the same for nginx and for PHP.
Let's start with just http
First things first, let's create our sandbox i.e. a small site that we will use for this article.
After a quick search on github.com, I've found a nice free one page html5/css3 template: https://github.com/peterfinlan/Sedna.
Create a temporary folder and download a sample static site
Let's download the Sedna demo site in a temporary folder on our hard disk, unzip the file, rename the default folder name Sedna-master to src and run the website using Docker:
mkdir -p /tmp/https_localhost && cd $_
wget https://github.com/peterfinlan/Sedna/archive/refs/heads/master.zip
unzip master.zip && rm master.zip && mv Sedna-master src
docker run -d --name static-site -p 80:80 -v ./src:/usr/local/apache2/htdocs httpd:2.4
Once these commands have been fired, please jump to http://locahost:8080 and you'll get this:

The site is running using the http protocol but https is not yet possible. So, let's continue...
Right now, please remove the running container; we'll create it back later on:
docker container rm static-site --force
Creation of some files we will need
As we've seen, we can run docker run -d --name static-site -p 80:80 -v ./src:/usr/local/apache2/htdocs httpd:2.4 and bingo, the site is running with http.
We can't use this single line for https because, among other things, we need to use a SSL certificate and we need to configure Apache to use it.
To make things clean and maintainable, let's create some files.
Make sure you're in the /tmp/https_localhost folder and create the following files.
Dockerfile
Please create a file called Dockerfile with the following content:
FROM httpd:2.4

COPY httpd/my-site.conf /etc/apache2/sites-available/my-site.conf
compose.yaml
The second file we'll need should be called compose.yaml with the following content:
services:
  apache:
    build:
      context: .
    ports:
      - "80:80"
    volumes:
      - ./src:/usr/local/apache2/htdocs
httpd/my-site.conf
The third file we'll need should be created in a httpd directory and has to be called my-site.conf with the following content:
<VirtualHost *:80>
    DocumentRoot /usr/local/apache2/htdocs
    ServerName localhost

    <Directory /usr/local/apache2/htdocs>
        AllowOverride All
        RewriteEngine On
        RewriteCond %{REQUEST_FILENAME} !-f
        RewriteRule ^(.*)$ index.html [QSA,L]
    </Directory>

    ErrorLog /usr/local/apache2/logs/error.log
    CustomLog /usr/local/apache2/logs/access.log combined

</VirtualHost>
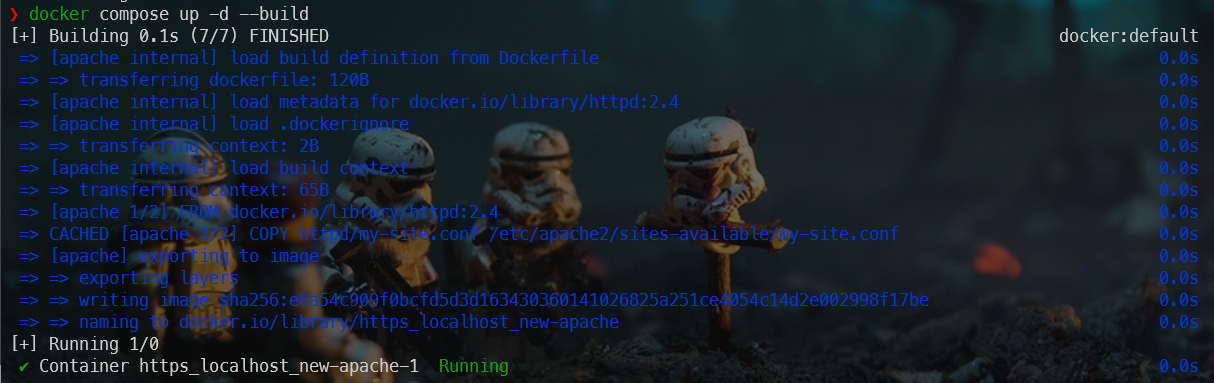
Everything is now in place for to enable a http access. Still in the /tmp/https_localhost folder, now, just run docker compose up -d --build to build our custom Docker image and run a container i.e. start the website.
You'll get something like this in the console:
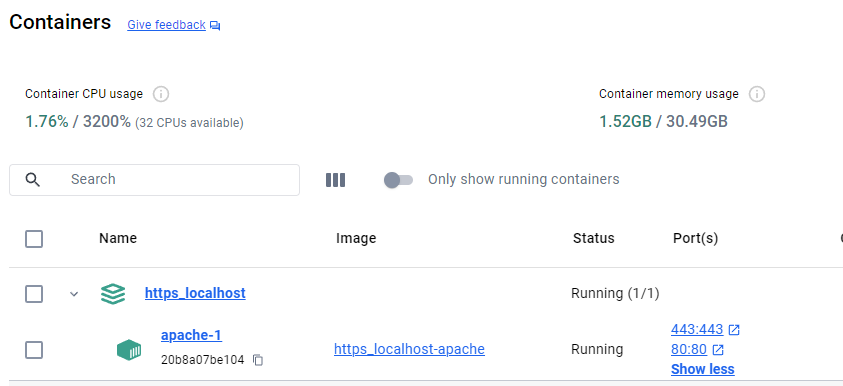
If we take a look on Docker Desktop, list of containers, we'll see our project (called https_localhost since it's the name of our folder in this blog post) and we'll see our apache service running on port 80.

By accessing http://localhost with the browser, we'll get our site, up and running:
Okay, so now we have confirmation that the three files we created above work and allow us http access. Let's go further with https.
Let's begin the journey to https
We have three main actions to take:
- Create our SSL certificate so we can use the SSL certificate,
- We'll need to teach Apache how to deal with our certificate and
- We'll need to update a few our Docker files.
Create the SSL certificate
Still in our /tmp/https_localhost folder, please create a directory called ssl and we'll create our certificate there.
To do this, you can just copy/paste the code below in your console:
mkdir -p ssl
(
    cd ssl
    openssl req -x509 -nodes -days 365 -newkey rsa:2048 -keyout server.key -out server.crt -subj "/C=US/ST=MyCountry/L=MyCity/O=MyOrganization/CN=localhost"
)
The console will display a list of characters but you'll get two new files in the current directory: server.crt and server.key.
The certificate (the .crt file) and the private key (the .key file) will be valid for one year.
As explained on https://hub.docker.com/_/httpd, the two files should be named like that, server.crt and server.key.
Updating our Apache configuration file
We need to update our Apache configuration file and add a Virtual host for port 443 i.e. the standard one for SSL.
Please edit the httpd/my-site.conf existing file and add the content below.
<VirtualHost *:80>
    DocumentRoot /usr/local/apache2/htdocs
    ServerName localhost

    <Directory /usr/local/apache2/htdocs>
        AllowOverride All
        RewriteEngine On
        RewriteCond %{REQUEST_FILENAME} !-f
        RewriteRule ^(.*)$ index.html [QSA,L]
    </Directory>

    ErrorLog /usr/local/apache2/logs/error.log
    CustomLog /usr/local/apache2/logs/access.log combined

</VirtualHost>

<VirtualHost *:443>
    DocumentRoot /usr/local/apache2/htdocs
    ServerName localhost

    SSLEngine on
    SSLCertificateFile "/usr/local/apache2/conf/server.crt"
    SSLCertificateKeyFile "/usr/local/apache2/conf/server.key"

    <Directory /usr/local/apache2/htdocs>
        AllowOverride All
        RewriteEngine On
        RewriteCond %{REQUEST_FILENAME} !-f
        RewriteRule ^(.*)$ index.html [QSA,L]
    </Directory>

    ErrorLog /usr/local/apache2/logs/error.log
    CustomLog /usr/local/apache2/logs/access.log combined

</VirtualHost>
Folder and file names are of major importance. The two certificate files should be saved in folder /usr/local/apache2/conf/ and be named server.crt and server.key. This because we're using an Apache Docker image; it's not the same if you're using, f.i., a PHP+Apache image.
Updating our compose.yaml file
Please edit the existing compose.yaml and add the new line below highlighted
services:
  apache:
    build:
      context: .
    ports:
      - "80:80"
      - "443:443"
    volumes:
      - ./src:/usr/local/apache2/htdocs
So we just need to expose the port 443 from the container to our host. That port is the standard one for the https protocol.
And, finally, updating our Dockerfile file
The last file we need to update is our existing Dockerfile with the new lines below:
FROM httpd:2.4

RUN apt-get update \
    && apt-get install -y apache2-utils libapache2-mod-php openssl \
    && rm -rf /var/lib/apt/lists/*

COPY ssl/server.crt /usr/local/apache2/conf/server.crt
COPY ssl/server.key /usr/local/apache2/conf/server.key

COPY httpd/my-site.conf /etc/apache2/sites-available/my-site.conf

RUN sed -i \
	-e 's/^#\(Include .*httpd-ssl.conf\)/\1/' \
	-e 's/^#\(LoadModule .*mod_ssl.so\)/\1/' \
	-e 's/^#\(LoadModule .*mod_socache_shmcb.so\)/\1/' \
	/usr/local/apache2/conf/httpd.conf

RUN a2enmod ssl \
    && a2enmod rewrite \
    && a2dissite 000-default default-ssl \
    && a2ensite my-site
Here we need to do a lot of stuff. We've to install (apt-get install) some Linux binaries to allow later use of a2enmod and the SSL protocol.
We need to copy our SSH key (files server.crt and server.key) in the right place.
We should also update the default httpd.conf file of Apache to include some files and some modules.
Finally, we should enable SSL and the mod rewrite of Apache, we've to disable the standard sites (000-default and default-ssl) and to enable ours (called my-site).
Ready to run the site using both http and https
At this stage, you should have a folder structure like this:

- A folder called
httpdcontaining a file calledmy-site.confthe configuration file for Apache, - A folder called
srcwith the HTML static website files (plenty of files; coming from Github), - A folder called
sslwith the SSL certificate we've created (a public certificate calledserver.crtand a private key calledserver.key), - A file called
compose.yamland - A file called
Dockerfile
Run the site
We need to update our Docker image since we've updated the Dockerfile so we'll run docker compose up -d --build to do this.
If we go back to Docker Desktop, we should see this:
We've enabled our site to be able to run on port 80 (http) and 443 (https).
Now that everything is in place, just go to https://localhost/ and badaboum... It's not working.
You'll most probably see the error below with the majority of browsers.
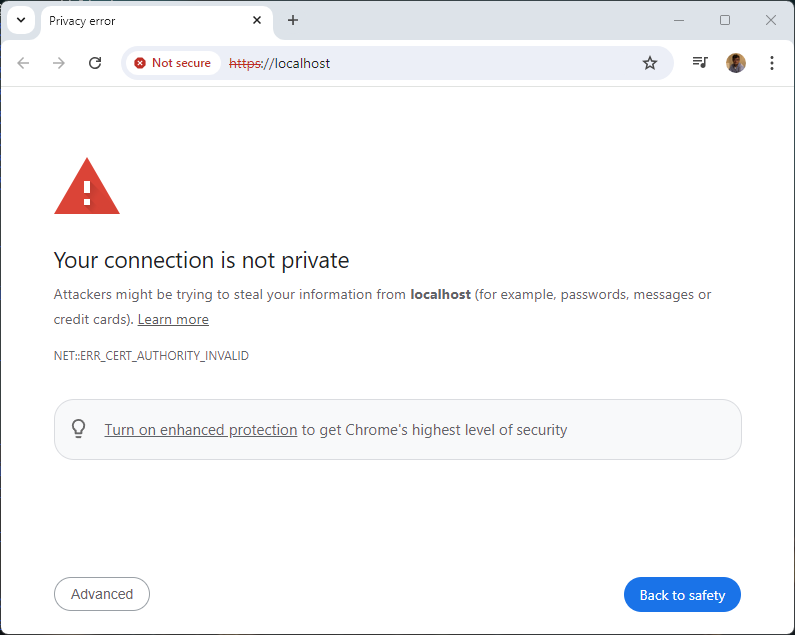
The reason is we're using a self-signed certificate and browsers didn't like this.
To make it working, you'll need to create an exception for such certificates.
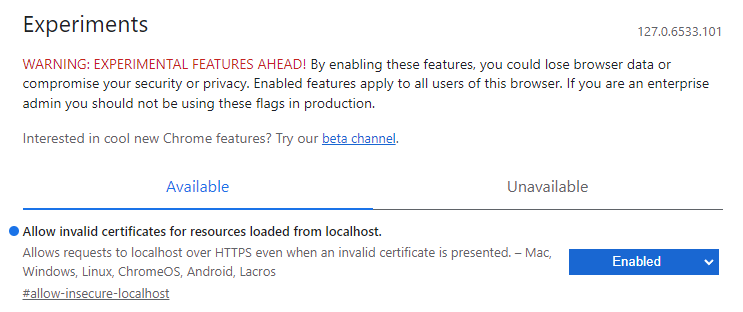
First follow this link: chrome://flags/#temporary-unexpire-flags-m118
Press CTRL+F and search for localhost then switch the feature to Enabled:
Now, by going back to https://localhost it'll work, you'll get the website but still with a Not secure flag:
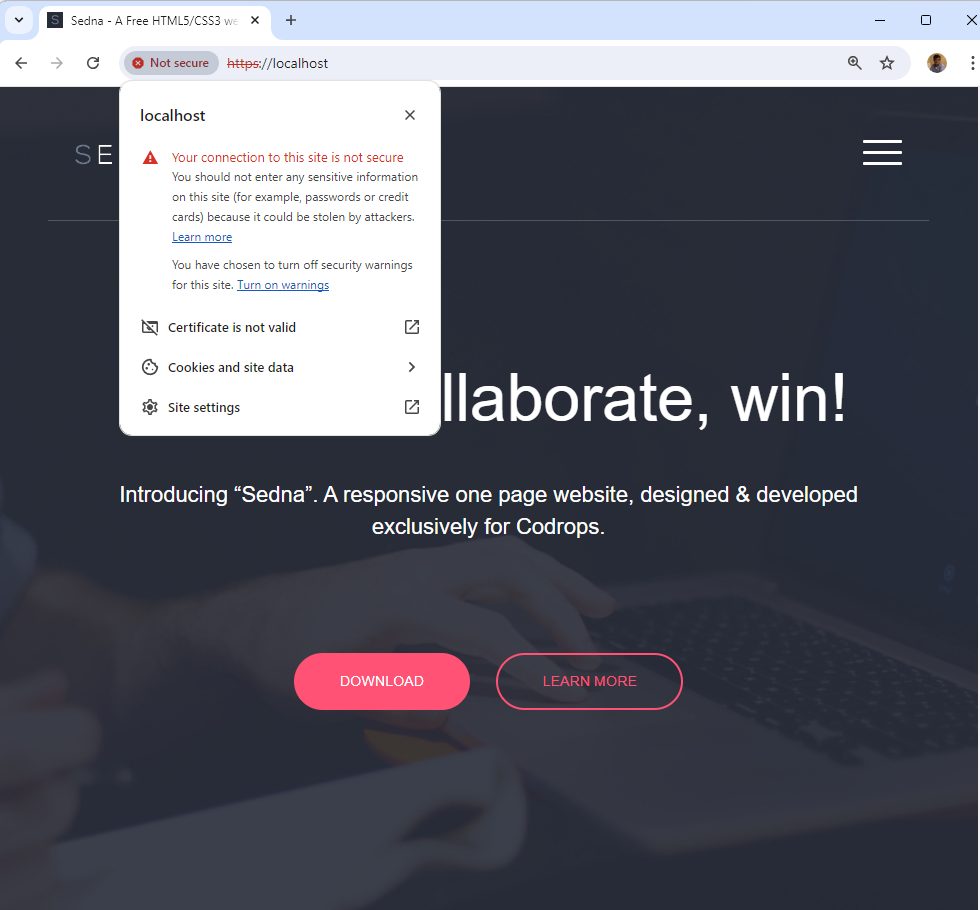
This flag is well expected so it's not an error. We're using a self-signed certificate and therefore not really trustworthy. However, it's enough to develop in localhost and under SSL.
I spent many hours - too many - writing this article. It looked simple, there are several articles here and there to give the impression that it would be easy, but it was not.
Because the majority of examples I found used a PHP or Nginx image and not Apache. Files and folders names are not the same and we should carefully used the ones required by Apache. It was not explicit at all.
Using curl
If you want to use curl to test your website, you'll get an error:
❯ curl https://localhost

curl: (60) SSL certificate problem: self-signed certificate
More details here: https://curl.se/docs/sslcerts.html

curl failed to verify the legitimacy of the server and therefore could not
establish a secure connection to it. To learn more about this situation and
how to fix it, please visit the web page mentioned above.
As explained above, the certificate is not valid so you have to use the --insecure flag and thus run: curl https://localhost --insecure.
Make sure to read the Install a root CA certificate in the trust store chapter.
Bonus - Configure nginx to use SSL
If you don't want Apache but nginx, please use files below instead.
It's basically the same but you'll notice some differences like in paths and the fact we don't need to install extra dependencies for PHP.
Dockerfile
Please create a file called Dockerfile with the following content:
FROM nginx:latest

RUN apt-get update \
    && apt-get install -y openssl \
    && rm -rf /var/lib/apt/lists/*

COPY ssl/server.crt /etc/nginx/ssl/server.crt
COPY ssl/server.key /etc/nginx/ssl/server.key

COPY httpd/my-site.conf /etc/nginx/conf.d/my-site.conf
compose.yaml
The second file we'll need should be called compose.yaml with the following content:
services:
  nginx:
    build:
      context: .
    ports:
      - "80:80"
      - "443:443"
    volumes:
      - ./src:/usr/share/nginx/html
httpd/my-site.conf
The third file we'll need should be created in a httpd directory and has to be called my-site.conf with the following content:
server {
    listen 80;

    server_name localhost;

    root /usr/share/nginx/html;
}

server {
    listen 443 ssl;
    listen [::]:443;

    server_name localhost;

    ssl_certificate /etc/nginx/ssl/server.crt;
    ssl_certificate_key /etc/nginx/ssl/server.key;

    root /usr/share/nginx/html;
 }
Bonus - Configure PHP to use SSL
If you don't want Apache but PHP (because you've to execute some PHP code), please use files below instead.
It's basically the same but you'll notice some differences like in paths and the fact we don't need to install extra dependencies for PHP.
Dockerfile
Please create a file called Dockerfile with the following content:
FROM php:8.3-apache

COPY ssl/server.crt /etc/ssl/certs/server.crt
COPY ssl/server.key /etc/ssl/private/server.key

COPY httpd/my-site.conf /etc/apache2/sites-available/my-ssl.conf

RUN a2enmod ssl && \
    a2enmod rewrite && \
    a2dissite 000-default default-ssl && \
    a2ensite my-ssl
compose.yaml
The second file we'll need should be called compose.yaml with the following content:
services:
  php:
    build:
      context: .
    ports:
      - "80:80"
      - "443:443"
    volumes:
      - ./src:/var/www/html/
httpd/my-site.conf
The third file we'll need should be created in a httpd directory and has to be called my-site.conf with the following content:
<VirtualHost *:80>
    DocumentRoot /var/www/html
    ServerName localhost

    <Directory /var/www/html>
        AllowOverride All
        RewriteEngine On
        RewriteCond %{REQUEST_FILENAME} !-f
        RewriteRule ^(.*)$ index.html [QSA,L]
    </Directory>

    ErrorLog /var/log/apache2/error.log
    CustomLog /var/log/apache2/access.log combined


</VirtualHost>

<VirtualHost *:443>
    DocumentRoot /var/www/html
    ServerName localhost

    SSLEngine on
    SSLCertificateFile "/etc/ssl/certs/server.crt"
    SSLCertificateKeyFile "/etc/ssl/private/server.key"

    <Directory /var/www/html>
        AllowOverride All
        RewriteEngine On
        RewriteCond %{REQUEST_FILENAME} !-f
        RewriteRule ^(.*)$ index.html [QSA,L]
    </Directory>

    ErrorLog /var/log/apache2/error.log
    CustomLog /var/log/apache2/access.log combined

</VirtualHost>
Bonus - Install a root CA certificate in the trust store
As explained here, we can trust, locally, our self-signed certificate.
To do this, we simply need to copy our .crt file to our /usr/local/share/ca-certificates folder and update the list of certificates. This can be done using the update-ca-certificates command.
The code below will install the certificate we've created in the blog post (ssl/server.crt) to the /usr/local/share/ca-certificates then run the update-ca-certificates command:
sudo apt-get install -y ca-certificates
sudo cp ssl/server.crt /usr/local/share/ca-certificates
sudo update-ca-certificates
And, now, we can f.i. run curl https://localost (without the --insecure flag). We'll no more received an error.